
Quick start concepts for beginners:
- Kombucha is sweet black or green tea that has been fermented with co-existing bacteria and yeast.
- Kombucha basic materials: jar, tea, sugar, and a previous batch of kombucha for inoculation.
- SCOBY (Symbiotic Culture Of Bacteria and Yeast): The co-existing bacteria and yeast turn plain sweet tea into tea that has a sweet and sour taste.
- Sour? Similar to lemonade that is sour and sweet, kombucha is delicious when prepared correctly.
- Prevent mold and kahm yeast by testing the acidity at the start. A pH at or below 4.5 will prevent these contamination problems.
- Kombucha contains healthy acetic and gluconic acid.
What You Need for a 1-Gallon or 4-Liter Batch
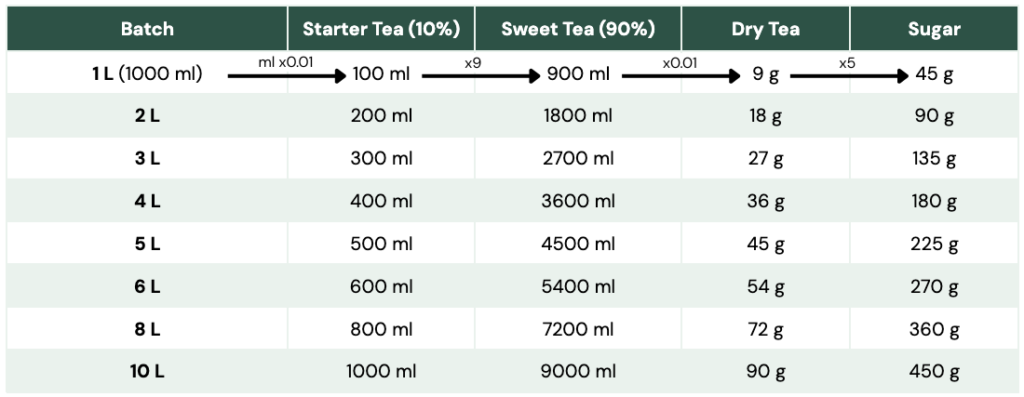
These amounts follow a fixed ratio: 10% starter tea, 90% sweet tea, 9g of dry tea and 45g of sugar per liter of total batch. The table below shows two common batch sizes, a 1-gallon jar for US customary measuring, and a 4-liter jar for metric. These aren’t the same volume (1 gallon is 3.8 L, not 4 L), they’re just two clean, round starting points depending on which system your jar and measuring tools use.
| Ingredient | 1 Gallon (US) | 4 Liters (Metric) |
|---|---|---|
| Total batch volume (Jar size) | 1 gallon | 4 L |
| Starter liquid (from a previous batch or a SCOBY purchase) | ~1½ cups | 400 ml |
| Sweet tea water amount | ~3½ quarts | 3.6 L |
| Black tea, dry | ~2 tbsp loose leaf | 36 g |
| White sugar | ~¾ cup + 1½ tbsp | 180 g |
Matt’s Note: This kombucha recipe scales linearly. Some online recipes will say “1 cup of sugar per gallon” which is a rounded number, not a scientific calculation. Be mindful of your measurements.
Equipment
- 1-gallon or 4-liter glass jar, wide mouth (see note above on batch sizing)
- Tightly woven cloth (cheesecloth folded over several times, or a coffee filter) and a rubber band to secure it
- Fine mesh strainer
- pH strips (kombucha-range, 0-6, are more precise than generic 0-14 strips)
- Swing-top glass bottles for second fermentation and storage. Screw-top bottles also work for non-carbonated kombucha preparations.
Step-by-Step Brewing Process
- Steep the tea. Bring the water to a boil, remove from heat, and steep the tea for 5 minutes or however long the tea supplier recommends. Remove the tea bags or strain out loose leaf.
- Dissolve the sugar. Stir the sugar into the hot tea until fully dissolved.
- Cool completely. Let the sweet tea cool to room temperature, below 85°F (30°C), before it touches the SCOBY. Heat will kill the culture.
- Combine in the jar. Pour the cooled sweet tea into your jar. Add the starter liquid and the SCOBY.
- Cover, don’t seal. Secure the cloth cover with a rubber band. This keeps fruit flies and dust out while still allowing airflow, which the culture needs.
- Ferment. Place the jar somewhere out of direct sunlight, at room temperature (70-75°F / 21-24°C). Fermentation typically takes 7-14 days. Warmer rooms ferment faster, cooler rooms slower. Taste as you go.
- Test the pH. Starting pH should read below 4.5. This is the threshold that keeps the batch safe from mold and pathogenic bacteria while the culture establishes itself. As fermentation progresses, pH continues dropping toward a finished range of roughly 2.5-3.5.
- Taste test starting around day 7.
- Kombucha that’s too sweet needs more fermentation time.
- Aim for kombucha that’s slightly sweet and acidic.
- Kombucha that’s fermented to a sharp vinegar taste should be used as a vinegar (makes great pickles) or dilute the acidic kombucha like you would dilute lemon juice to make lemonade.
- Flavors will set in the refrigerator.
If your batch grows fuzzy mold (blue, black, or white fuzz), discard the entire batch and the SCOBY. Do not attempt to salvage it. A thin, flat, off-white film (kahm yeast) is different and generally not dangerous, but if you’re ever uncertain, it’s not worth the risk. This shouldn’t happen if your pH is below a 4.5
Bottling and Second Fermentation
- Remove the SCOBY and set aside with 10% of the finished liquid as starter for your next batch.
- Strain the remaining kombucha through your mesh strainer into swing-top bottles, leaving about an inch of headspace.
- For carbonation or flavor, add fruit, juice, or herbs at this stage and seal the bottles.
- Leave at room temperature for 1-3 days to build carbonation, then refrigerate to slow fermentation and lock in flavor.
Matt’s Note: pH strips tell you what’s happening with the acidity but you should be tasting as you go. The more you taste the more you understand kombucha and the faster you get consistent products you like.
Resources
- Free Fermentation Logbook here: https://cressdietetics.subscribepage.io/
- Why mold grows on food and ferments (Blog)
https://cressdietetics.com/why-mold-grows-on-foods-including-fermented-foods/ - Tea steeping blog post: https://cressdietetics.com/tea-herbal-steeping-for-kombucha/
- Gram Baking Equivalency Sheet (for measuring sugar and tea easier): https://cressdietetics.com/product/gram-baking-equivalency-sheet-basic-version/
- Kombucha STUDY: A Review on Kombucha Tea—Microbiology, Composition, Fermentation, Beneficial Effects, Toxicity, and Tea Fungus https://ift.onlinelibrary.wiley.com/doi/10.1111/1541-4337.12073
- Craft A Brew kits: https://www.craftabrew.com (use code CRESS at checkout for 10% off – affiliation)
Buy Kombucha Materials
- 1-gallon USDA Fermentation Glass Jars, Set of 4 https://amzn.to/4j52xrQ
- pH Test Strips for Kombucha Brewing 0-6 (0.5 Intervals) 100pc Kit https://amzn.to/4xoEKXe
- PH Meter with Automatic Calibration | 7Pros https://amzn.to/4rgEIQ7
- Cheese Cloths, Grade 90 (9 Sq Feet) 100% Reusable Cotton https://amzn.to/4xvKcIa
- Walfos 8.6 Inch Large Fine Mesh Strainer https://amzn.to/4xWdgtf
- 16 oz. Swing Top Glass Bottles with Flip Top and Airtight Caps https://amzn.to/4cNbItf
- Wild Fermentation by Sandor Katz https://amzn.to/4irh80B
Thank you for reading and supporting Cress Dietetics!
Happy fermenting!
Matthew Cress